Yumi的机械臂配置
- 关节名称(在
yumi_moveit_config/config/controllers.yaml中定义)yumi_joint_1_l,yumi_joint_2_l,yumi_joint_7_l,yumi_joint_3_l,yumi_joint_4_l,yumi_joint_5_l,yumi_joint_6_l - 关节与连杆
- 关节顺序:1->2->7->3->4->5->6 (读取与写入都按照此顺序)
- 连杆顺序:1->2->3->4->5->6->7

Yumi的关节运行范围
| Axis | Axis 1 | Axis 2 | Axis 7 | Axis 3 | Axis 4 | Axis 5 | Axis 6 |
|---|---|---|---|---|---|---|---|
| Degree of motion | |||||||
| -2.94088 to 2.94088 | -2.50455 to 0.759218 | -2.94088 to 2.94088 | -2.15548 to 1.39626 | -5.06145 to 5.06145 | -1.53589 to 2.40855 | -3.9968 to 3.9968 |
YuMi的运动学模型
- Denavit-Hartenberg Modified方法(参考:Dynamic Identification of YuMi ABB Collaborative Robot, by M.Taghbalout et al.,注意Yumi的两侧手臂是一样的(不是对称的)
| 1 | ||||
| 2 | ||||
| 3 | ||||
| 4 | ||||
| 5 | ||||
| 6 | ||||
| 7 |
齐次变换矩阵
- YuMi的左右臂是完全一样的,区别在于机械臂根部的偏移量
- 左臂world -> link1(joint 1):
[[-0.57156128, -0.10484001,  0.8138343 ,  0.05355,   ],
 [ 0.61696927, -0.70879449,  0.34199312,  0.0725 ,   ],
 [ 0.54098671,  0.69758078,  0.46980255,  0.51492,   ],
[ 0. , 0. , 0. , 1. , ]]- 右臂world -> link1 (joint 1):
[[-0.57125902,  0.10708908,  0.81375369,  0.05355   ],
 [ -0.6197542, -0.70629809,  -0.3421224,  -0.0725   ],
 [  0.5381151, -0.69976777,  0.46984806,  0.51492   ],
[ 0. , 0. , 0. , 1. ]]-
link1 -> link2(joint 2):
-
link2 -> link3 (joint 7):
-
link3 -> link4 (joint 3):
-
link4 -> link5 (joint 4):
-
link5 -> link6 (joint 5):
-
link6 -> link7(joint 6):
运行
- 确定所有任务处在停止状态
- 进入Program Editor界面按”-“键(按键面板最上方四个一组中的一条横杠) 将重置所有代码的起始位置
- 按play键(按键面板最下方四个一组中的三角播放按键),进入等待链接的状态
- 运行ROS节点开始于Yumi的通信
roslaunch yumi_launch yumi_pos_control.launch - 使用Moveit对机械臂进行控制
roslaunch yumi_moveit_config demo_online.launch - 整合了启动ROS节点和Moveit的脚本:(coil_dev分支)运行Rviz+Moveit,通过RWS控制Yumi
roslaunch yumi_moveit_config rws_online.launch
运行状态的区别
- 运行状态有两种,Auto和Manual。
- Manual的速度较低(最高速度为250mm/s,参见Operating manual),主要用于测试。
In manual mode, the controller limits the max speed of arm movements to 250 millimeters per second (mm/s). Automatic mode allows YuMi to move up to 2 meters per second (m/s).
- Auto可以达到全速效果(2m/s?1.5m/s?Operating manual的Global Speed Limit)
- 100%时如果通过RWS控制,机械臂会出现抖动
- Arm Check Point Speed Limit是什么?(0.75m/s,只存在于IRB 14000)
| Joints | Axis 1 | Axis 2 | Axis 7 | Axis 3 | Axis 4 | Axis 5 | Axis 6 |
|---|---|---|---|---|---|---|---|
| Max velocity |
- ROS 2 Integration of the ABB YuMi Dual
- Max TCP Velocity
- Max TCP Velocity
运行速度的配置
- 配置文件为
yumi_moveit_config/config/joint_limits.yaml - 所有关节的最大速度已设置为手册中的最大值,加速度无限制
获取机械臂当前运行状态
获取关节状态
rostopic echo /joint_states关节顺序参考name属性
获取机械臂末端位姿
rosrun tf tf_echo world yumi_link_7_l(应该是yumi_link_7_l还是gripper_l_base?)
Yumi的位姿与TF
TF树
- Yumi的TF采用的是link作为参考,顺序为1->2->3->4->5->6->7,不是关节顺序的1->2->7->3->4->5->6
world与yumi_body的之间没有旋转关系,后者比前者高(z轴正向)0.1m。yumi_base_link和yumi_body重合,方向一致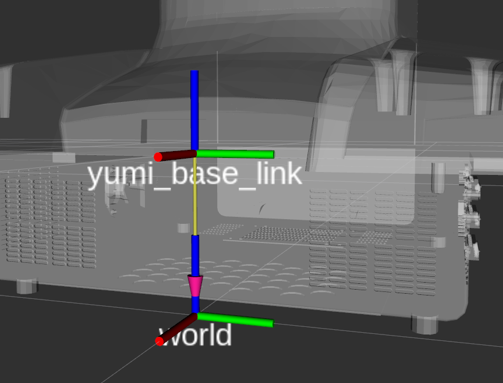
- 默认的末端为第六个关节(yumi_link_7_l或yumi_link_7_r),不包括夹爪。
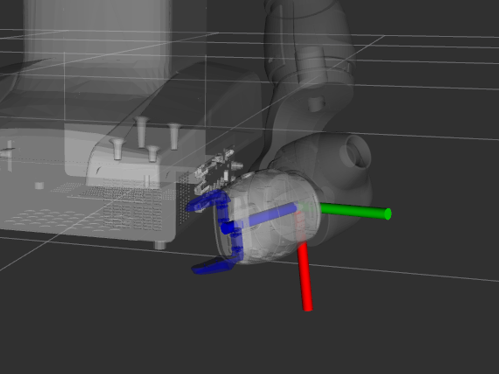
- yumi_link_7_l与gripper_l_base的位置相同,但是方向不同(沿z轴旋转
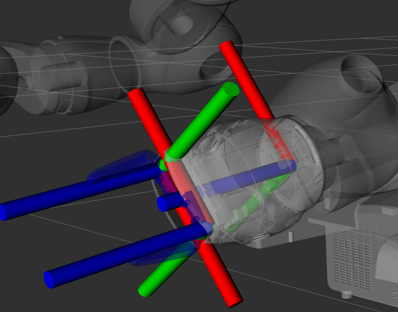
- 夹爪的参照系为:z轴从夹爪间向外,x轴与吸盘安装方向平行但反向,y轴垂直于相机成像平面与之反向,中心位于夹爪安装法兰。图中为gripper_l_base,gripper_l_finger_r和gripper_l_finger_l
参考姿态
右手姿态
-
两夹爪所在平面水平于桌面,Joint6角度固定在
yumi_link_7_r的位姿: -
两夹爪所在平面垂直于桌面, Joint6角度固定在
yumi_link_7_r位姿:
空间中的姿态
- TF输出:RPY,以固定坐标系为基准旋转,roll(世界坐标x轴 ),pitch(世界坐标y轴),yaw(世界坐标z轴)
- left arm at (x, y, z)=(0.4, 0.3, 0.3) and RPY= (90, 0, 90) (以TF为基准)
quat = euler.euler2quat(pi/2, 0, pi/2, 'sxyz')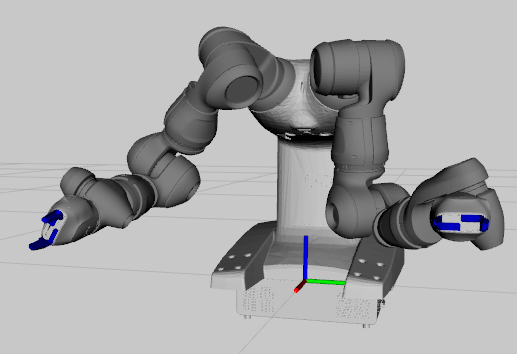
- left arm at (x, y, z)=(0.4, 0.3, 0.3) and RPY= (90, 0, -90)
q = euler.euler2quat(-pi/2, 0, pi/2, 'sxyz')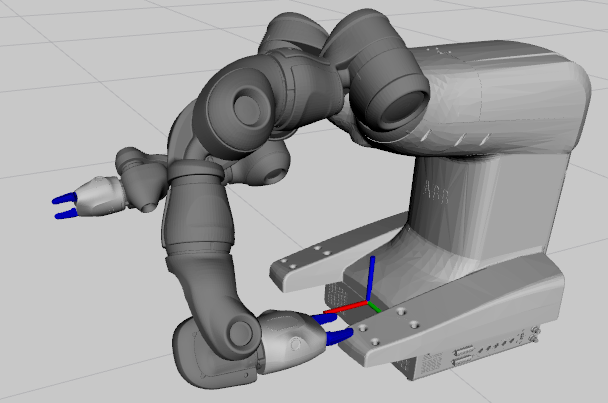
- left arm at (x, y, z)=(0.3, 0.3, 0.4) and RPY= (90, 0, 0)
q = euler.euler2quat(-pi/2, 0, pi/2, 'sxyz')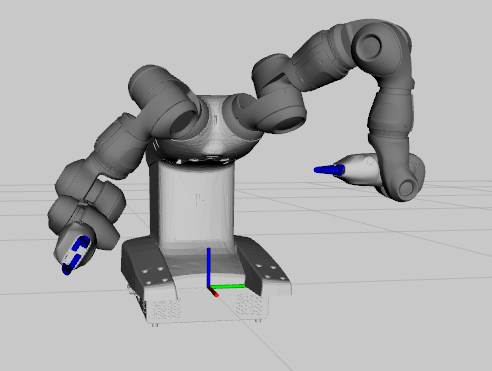
- left arm at (x, y, z)=(0.4, 0.2, 0.3) and RPY= (135, 0, 0)
q = euler.euler2quat(0, 0, pi/4, 'sxyz')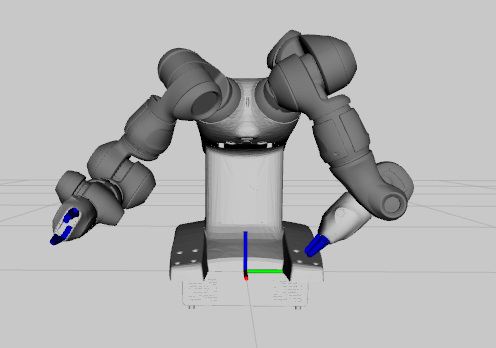
- left arm at (x, y, z)=(0.36, 0.28, 0.7) and RPY= (180, 0, 0)
q = euler.euler2quat(0, 0, 0, 'sxyz')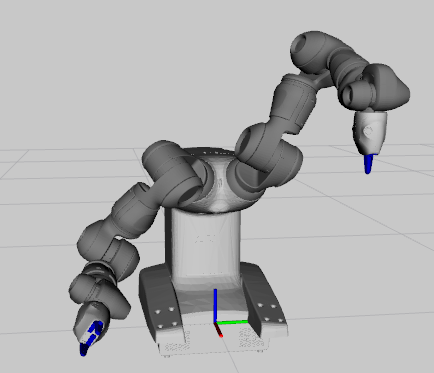
API
yumi_gazebo_pos_control.launch
- topic:
| topic | ||
|---|---|---|
/yumi/gripper_effort_controller_l/command | std_msgs/Float64 | gripper控制,大致在0.04的时候会快速完全张开,0.035时张开速度比较慢,0.031时张开速度极慢,0.03时会慢慢闭合 |
/yumi/joint_states | sensor_msgs/JointState | 关节状态,提供所有关节的position, velocity和effort |
/yumi/joint_pos_controller_1_l/command | std_msgs/Float64 | 关节角度控制。 |
yumi_gazebo_traj_pos_control.launch
- topic
| topic | ||
|---|---|---|
/yumi/gripper_effort_controller_l/command | std_msgs/Float64 | Gripper控制 |
/yumi/joint_states | sensor_msgs/JointState | 关节状态 |
/yumi/joint_traj_pos_controller_l/command | trajectory_msgs/JointTrajectory | |
/yumi/joint_traj_pos_controller_l/follow_joint_trajectory/cancel | actionlib_msgs/GoalID | |
/yumi/joint_traj_pos_controller_l/follow_joint_trajectory/feedback | control_msgs/FollowJointTrajectoryActionFeedback | |
/yumi/joint_traj_pos_controller_l/follow_joint_trajectory/goal | control_msgs/FollowJointTrajectoryActionGoal | |
/yumi/joint_traj_pos_controller_l/follow_joint_trajectory/result | control_msgs/FollowJointTrajectoryActionResult | |
/yumi/joint_traj_pos_controller_l/follow_joint_trajectory/status | actionlib_msgs/GoalStatusArray |
rws_online.launch
- topic
| topic | |||
|---|---|---|---|
/yumi/gripper_l_effort_cmd | std_msgs/Float64 | Gripper控制 -20为打开,20为闭合 | |
/yumi/joint_traj_pos_controller_l/command | trajectory_msgs/JointTrajectory | ||
/yumi/joint_traj_pos_controller_l/follow_joint_trajectory/cancel | |||
/yumi/joint_traj_pos_controller_l/follow_joint_trajectory/feedback | |||
/yumi/joint_traj_pos_controller_l/follow_joint_trajectory/goal | control_msgs/FollowJointTrajectoryActionGoal | ||
/yumi/joint_traj_pos_controller_l/follow_joint_trajectory/result | control_msgs/FollowJointTrajectoryActionResult | ||
/yumi/joint_traj_pos_controller_l/follow_joint_trajectory/status | actionlib_msgs/GoalStatusArray | ||
/yumi/joint_traj_pos_controller_l/state | control_msgs/JointTrajectoryControllerState | ||
/yumi/joint_traj_pos_contoller_r/command |
IK求解器Trac-ik
```
>>> ik_solver = IK("yumi_body", "gripper_l_base")
>>> ik_solver.joint_names
('yumi_joint_1_l', 'yumi_joint_2_l', 'yumi_joint_7_l', 'yumi_joint_3_l', 'yumi_joint_4_l', 'yumi_joint_5_l', 'yumi_joint_6_l')
```
- 返回值分别对应joint1, joint2, joint7, joint3, joint4, joint5, joint6
实体控制
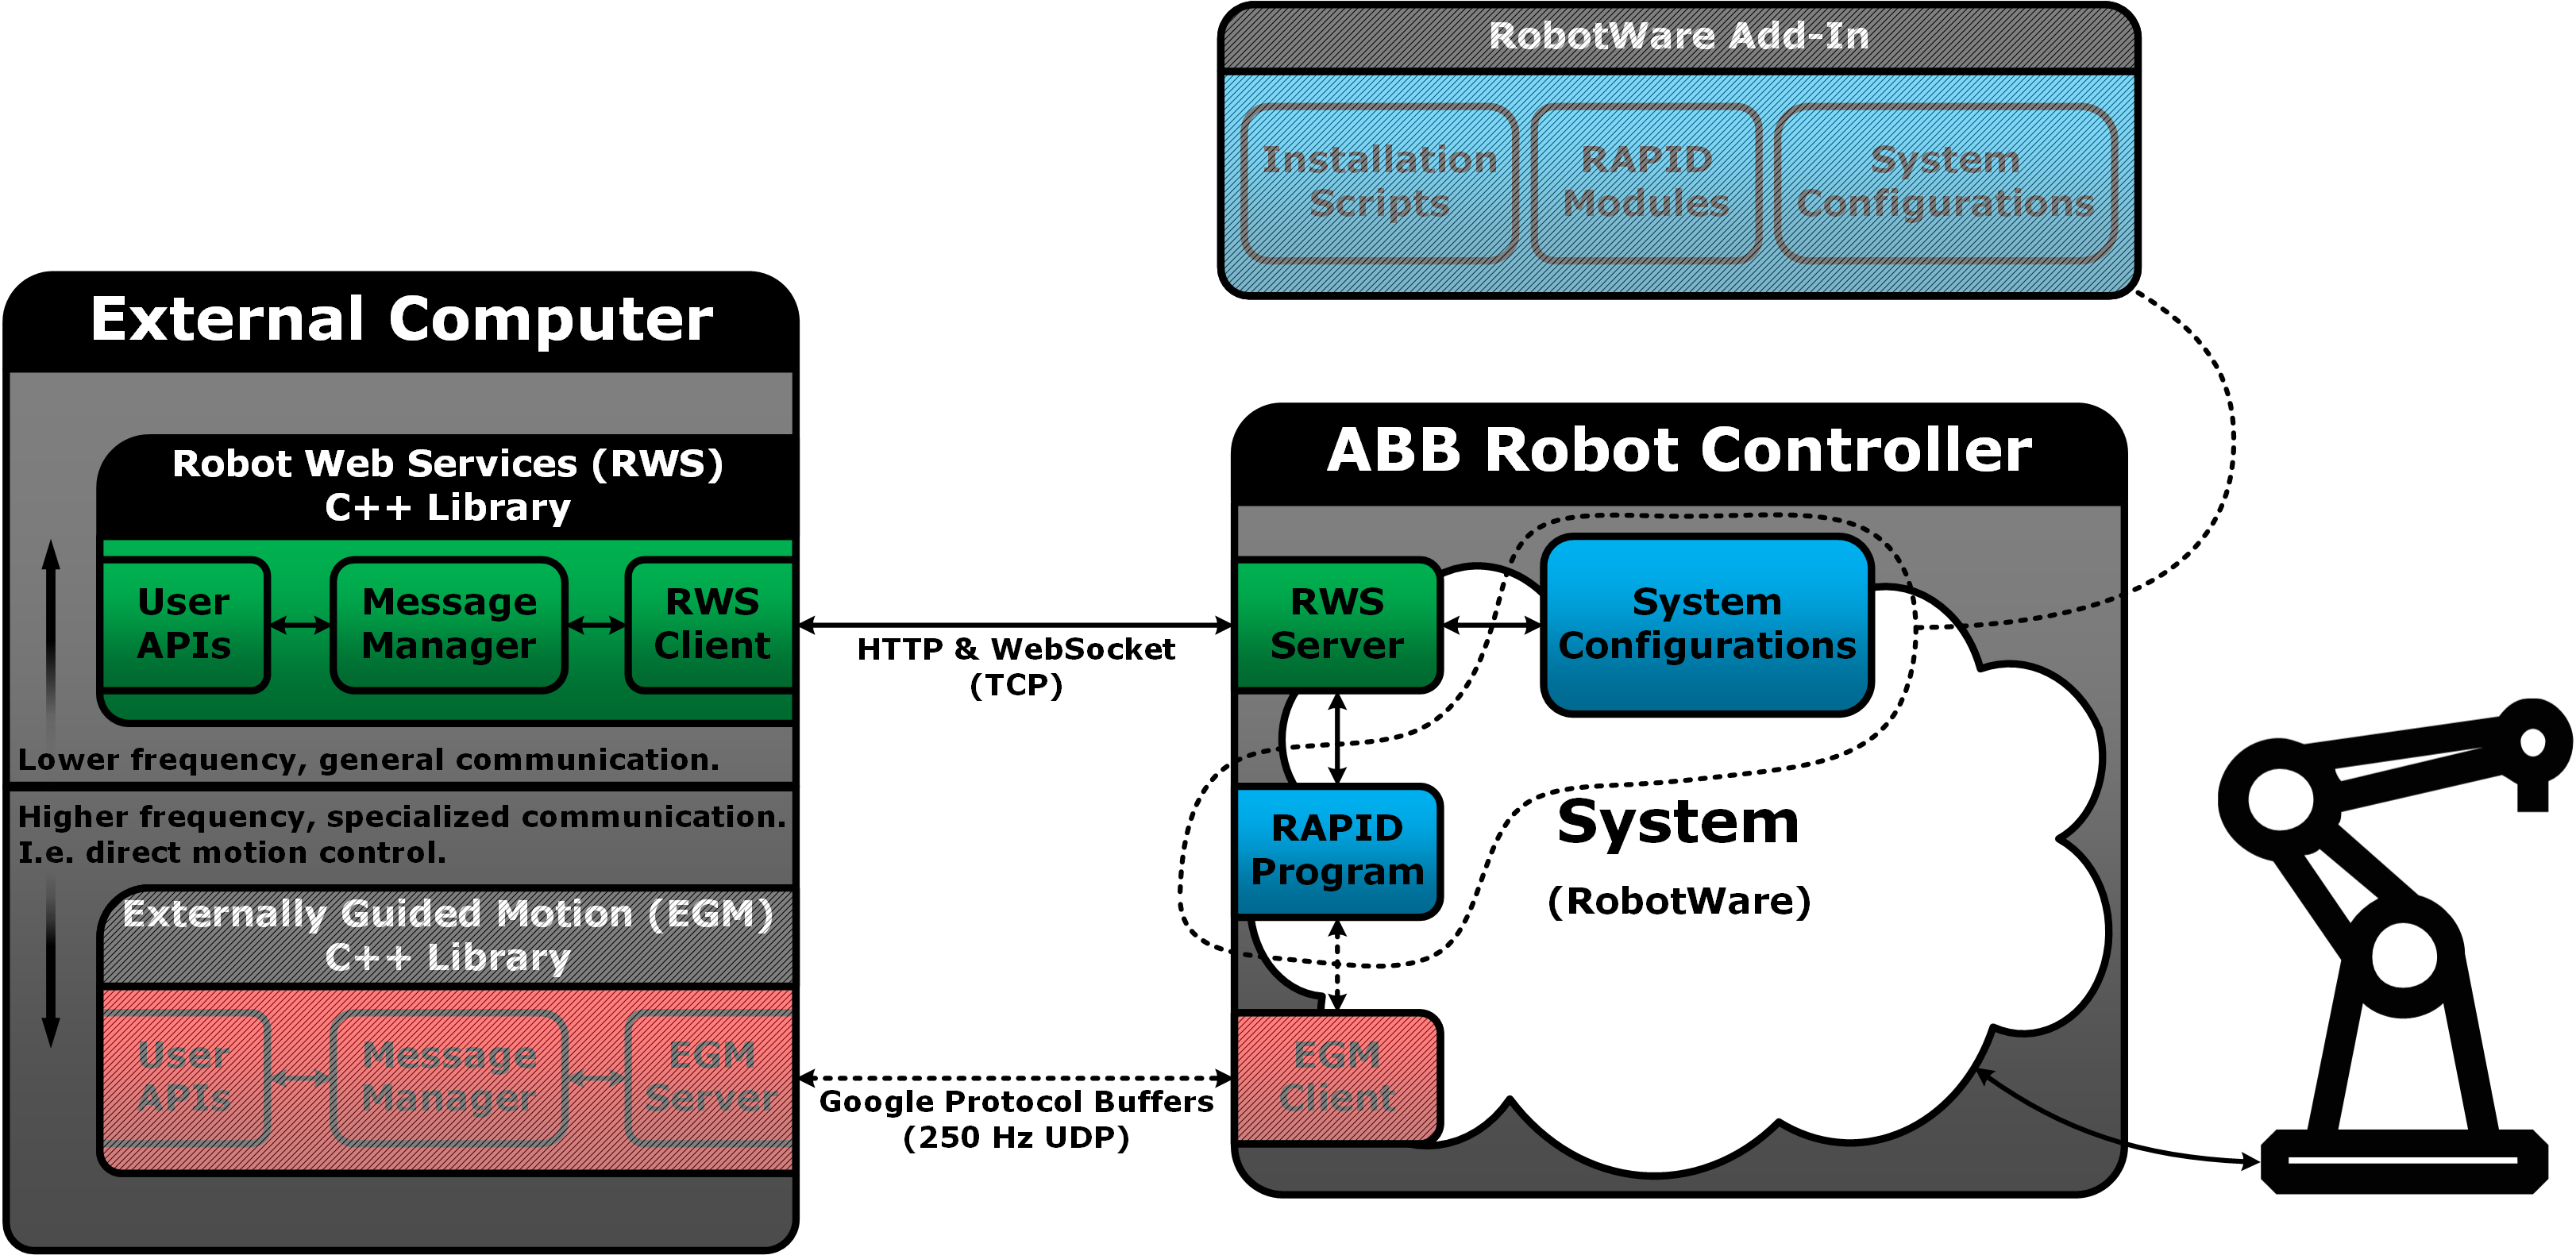
Depending on what you want to use YuMi for, you may make use of one of the following movement interfaces:
Position control through ABB Driver: This interface has a bandwidth of about 10Hz**?**. If you are interested only in driving YuMi arms to certain positions, it might be a good choice. Interface: ROS control, through position JointTrajectoryControllers.
Position control through RobotWebServices: This interface has a bandwidth of about 10Hz. If you are interested only in driving YuMi arms to certain positions, it might be a good choice. Interface: ROS control, through position JointTrajectoryControllers and JointPositionControllers.
Velocity control through EGM: This interface has a bandwidth of approximately 250Hz. If you are interested in driving YuMi arms to certain positions quickly and with high dexterity, it might be the best choice. Interface: ROS control, through JointTrajectoryControllers or JointVelocityControllers.
All control interfaces are fully compatible with MoveIt!, given that you use JointTrajectoryControllers for driving the arms of your YuMi.
- 基于Ubuntu系统ROS环境控制ABB Yumi机器人实体
- https://github.com/kth-ros-pkg/yumi/wiki/Firmware
- https://github.com/ethz-asl/yumi/wiki/Setting-Up-YuMi#home-screen
- https://github.com/bhomaidan1990/YuMi_Project_documentation
Everytime you power on the YuMi, or you close the YuMi ROS nodes running on your PC, you need to run the RAPID scripts again (they are Normal tasks inside the IRC5 controller due to safety reasons).
To do that, press the following physical buttons on the FlexPendant:
Toggle the Motors On on the FlexPendant by pressing the upper-right corner button that has three horizontal lines.
Toggle the Auto mode on the FlexPendant by pressing the upper-right corner button that has two horizontal lines.
Move all the program pointers of the RAPID routines to main(), by pressing the upper-right corner button that has one centered horizontal line.
Press the Play button located in the bottom-right corner.
sudo ifconfig <interface> 192.168.125.50
You will need to edit your /etc/hosts file with the following:
192.168.125.3 OPTODAQ-LEFT
192.168.125.4 OPTODAQ-RIGHT
运行时错误的解决:
-
/usr/bin/env: ‘python’: No such file or directory运行sudo apt install python-is-python3 -
_Failed to connect to server_, rc: -1. _Error_: '_Connection refused_' (errno: 111)需要点击play按键(面板右侧实体按键)让FlexPendant上的程序先运行起来,否则会报错 -
REQUIRED process [yumi/yumi_grippper-5] had died!
IK solver
- On GitHub
- Issac simulation
- IK solution
- Trac-IK
- IKFast
- KDL IK
https://arxiv.org/pdf/2011.03914.pdf https://arxiv.org/pdf/1905.11176.pdf https://mcube.mit.edu/pdfs/toolUse2019.pdf https://upcommons.upc.edu/bitstream/handle/2117/124820/Akbari%20TAMP.pdf https://elib.uni-stuttgart.de/bitstream/11682/10824/3/Felix-Beuke-Dissertation-98.pdf https://arxiv.org/abs/1710.06947
MoveIt
GUI and setup
- 配置: 参考MoveIt配置的章节
Ref
- Tutorials
- https://mirrors.sjtug.sjtu.edu.cn/ros/ubuntu/pool/main/r/ros-indigo-yumi-moveit-config/
- https://github.com/kth-ros-pkg/yumi/wiki/MoveIt!
programming
末端机械爪的控制
-
夹爪只实现了力控,夹爪将以恒定的力运行直至完全打开或完全闭合,数值范围为
Currently, YuMi only allows very simple control of the grippers, by setting an effort command in the range [-20, 20].
-
不使用时建议将力设置为0。参考
The YuMi grippers tend to get very warm when performing opening and closing operations. Hence, it is strongly recommended, to send them a zero effort command when they are not being used.
-
可以通过service或者topic进行控制
- topic,参数effort_command为-20到20之间的浮点数:
gripper_l_cmd_pub = rospy.Publisher("/yumi/gripper_l_effort_cmd", Float64, queue_size=1) gripper_l_cmd_msg = effort_command gripper_l_cmd_pub.publish(effort_command) gripper_r_cmd_pub = rospy.Publisher("/yumi/gripper_r_effort_cmd", Float64, queue_size=1) gripper_r_cmd_msg = effort_command gripper_r_cmd_pub.publish(effort_command) -
20为闭合,-20为打开数值为力,正值为闭合时施加的力,负值为打开时施加的力所给的示例为将其打开/闭合后将力设置为0- KTH的示例
#Set the gripper to an effort value def gripper_effort(gripper_id, effort): """Set gripper effort Sends an effort command to the selected gripper. Should be in the range of -20.0 (fully open) to 20.0 (fully closed) :param gripper_id: The ID of the selected gripper (LEFT or RIGHT) :param effort: The effort value for the gripper (-20.0 to 20.0) :type gripper_id: int :type effort: float :returns: Nothing :rtype: None """ rospy.loginfo("Setting gripper " + str(gripper_id) + " to " + str(effort)) rospy.loginfo('Setting gripper effort to ' + str(effort) + ' for arm ' + str(gripper_id)) if (gripper_id == RIGHT): pubname = '/yumi/gripper_r_effort_cmd' if (gripper_id == LEFT): pubname = '/yumi/gripper_l_effort_cmd' pub = rospy.Publisher(pubname, std_msgs.msg.Float64, queue_size=10, latch=True) pub.publish(std_msgs.msg.Float64(effort)) rospy.sleep(1) def close_grippers(arm): """Closes the grippers. Closes the grippers with an effort of 15 and then relaxes the effort to 0. :param arm: The side to be closed (moveit_utils LEFT or RIGHT) :type arm: int :returns: Nothing :rtype: None """ yumi.gripper_effort(arm, 15.0) yumi.gripper_effort(arm, 0.0)- 若使用的是 OrebroUniversity/yumi包,没有KTH提供的topic/service。控制gripper的topic为
/yumi/gripper_effort_controller_l/command及/yumi/gripper_effort_controller_r/command
Moveit界面
- 橘黄色的为
Planning Request -> Query Goal State,点掉勾后即可隐藏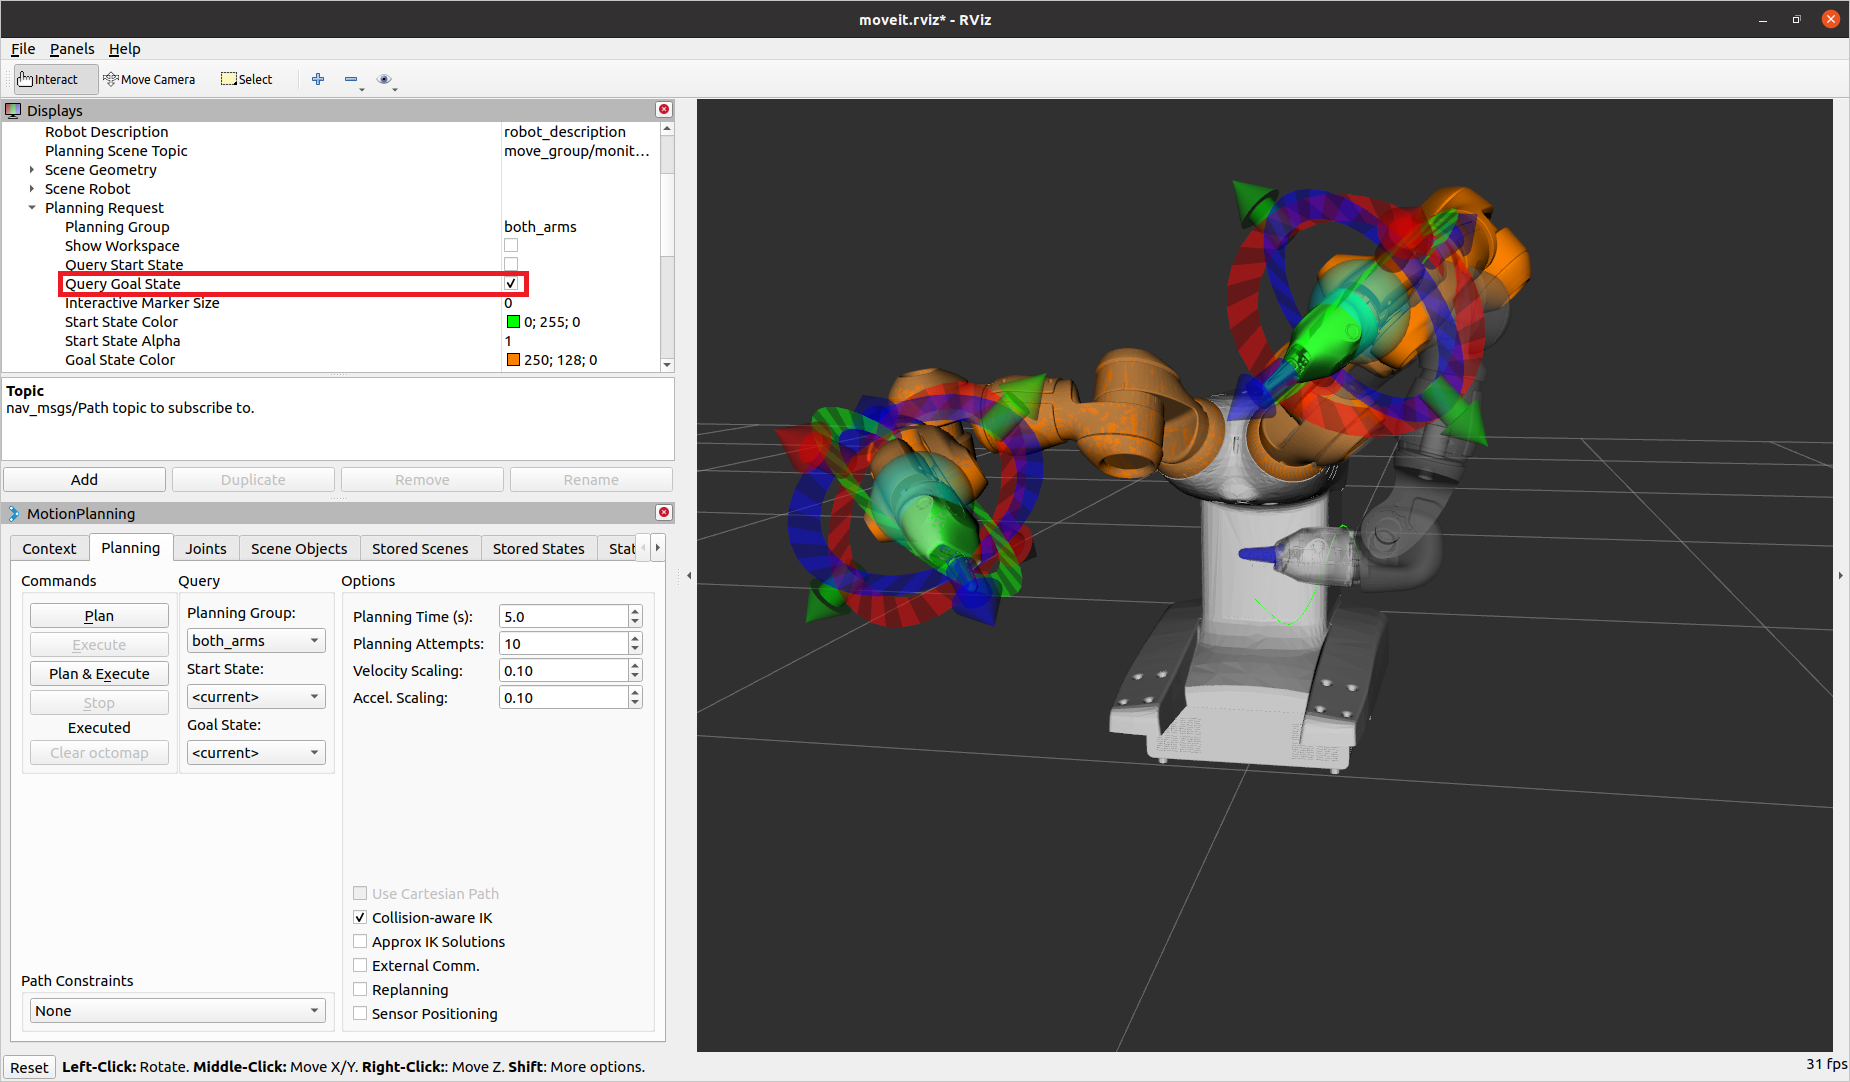
基于关节空间的控制
设置关节角度
- 设置的数据与关节的对应关系:1->2->7->3->4->5->6
group.set_joint_value_target(value_list)读取关节角度
- 读出的数据与关节的对应关系:1->2->7->3->4->5->6
group = moveit_commander.MoveGroupCommander('left_arm')
group.get_current_joint_values()
调试信息
- 以Yumi为例:
/yumi/joint_traj_pos_controller_l/command用于接收关节运动轨迹命令,参考/yumi/joint_traj_pos_controller_l/follow_joint_trajectory/feedback分为三类显示:desired目标,actual机械臂当前状态和error误差, 显示数据包括positions/velocities/accelerations/effort/time_from_start/yumi/joint_traj_pos_controller_l/follow_joint_trajectory/goal数据包括positions/velocities/accelerations/effort/time_from_start/yumi/joint_traj_pos_controller_l/follow_joint_trajectory/result显示error code (-5?),goal error?/yumi/joint_traj_pos_controller_l/follow_joint_trajectory/status显示statuscode为1或者4?/yumi/joint_traj_pos_controller_l/follow_joint_trajectory/cancel/yumi/joint_traj_pos_controller_l/state分为三类显示:desired目标,actual机械臂当前状态和error误差, 显示数据包括positions/velocities/accelerations/effort/time_from_start
获取所有关节列表
rosparam get /r_arm_controller/joints
通过消息进行关节运动轨迹控制
- 消息的构建
rostopic pub /yumi/joint_traj_pos_controller_l/command trajectory_msgs/JointTrajectory "header: seq: 0 stamp: secs: 0 nsecs: 0 frame_id: '' joint_names: - yumi_joint_1_l - yumi_joint_2_l - yumi_joint_7_l - yumi_joint_3_l - yumi_joint_4_l - yumi_joint_5_l - yumi_joint_6_l points: - positions: [-1.6462398604161814, -1.4008239170183066, 1.3920098862491554, -0.20046380540953238, 0.28308688057483444, 1.1438220560595516, -1.9764012244017009] time_from_start: {secs: 2, nsecs: 0}" -1 - 代码示例
import rospy import sys import copy import moveit_commander import moveit_msgs.msg from std_msgs.msg import Header, String from trajectory_msgs.msg import JointTrajectory from trajectory_msgs.msg import JointTrajectoryPoint def talker(): rospy.init_node('tester', anonymous=True) rate = rospy.Rate(10) pub = rospy.Publisher('/yumi/joint_traj_pos_controller_l/command', JointTrajectory, queue_size=10) rospy.sleep(1) jval_list = [[-1.910732488289212, -1.948345991647264, 0.9311644675113045, -0.48049726173310014, 1.0077526698255987, 1.4434956391402247, 3.7831853071795862],\ [-1.4381221301992597, -1.969164396057361, 1.4351484047723992, 0.11691985332275436, 0.793984982122215, 1.1115103530485912, 3.2595865315812875],\ [-1.0759694790727565, -1.7653101852953867, 1.7330118510252739, 0.6222073599452446, 0.6174048532482165, 0.8363342378308655, 2.735987755982989]] joints_str = JointTrajectory() joints_str.header = Header() joints_str.header.stamp = rospy.Time.now() joints_str.joint_names = ['yumi_joint_1_l','yumi_joint_2_l','yumi_joint_7_l','yumi_joint_3_l','yumi_joint_4_l','yumi_joint_5_l','yumi_joint_6_l'] for i in range(len(jval_list)): point = JointTrajectoryPoint() point.positions = jval_list[i] point.time_from_start = rospy.Duration(10+i*5) joints_str.points.append(point) pub.publish(joints_str) rospy.sleep(1) if __name__ == '__main__': talker() - 缺陷:无法直观的获得运动状态结果
通过actionlib进行关节控制
- 注意一开始声明client的时候会选择控制器,如
joint_traj_pos_controller_l,如果选择了这个控制器就只能控制其下的关节。joint_names要填写全部关节,控制时的角度列表也应该与每个关节一一对应。
import rospy
import actionlib
from trajectory_msgs.msg import JointTrajectoryPoint
from control_msgs.msg import  FollowJointTrajectoryAction, FollowJointTrajectoryGoal


class Trajectory(object):
    def __init__(self):
        self.client = actionlib.SimpleActionClient('/yumi/joint_traj_pos_controller_l/follow_joint_trajectory', FollowJointTrajectoryAction)

        self.client.wait_for_server()

    def exec(self, traj):
        goal =  FollowJointTrajectoryGoal()

        goal.trajectory.joint_names = ['yumi_joint_1_l','yumi_joint_2_l','yumi_joint_7_l','yumi_joint_3_l','yumi_joint_4_l','yumi_joint_5_l','yumi_joint_6_l']

        for i in range(len(traj)):
            point = JointTrajectoryPoint()
            point.positions = traj[i]
            point.time_from_start = rospy.Duration(10+i*5)

            goal.trajectory.points.append(point)

        self.client.send_goal(goal)

        self.client.wait_for_result()

        return self.client.get_result()


def main():

    jval_list = [[-1.910732488289212, -1.948345991647264, 0.9311644675113045, -0.48049726173310014, 1.0077526698255987, 1.4434956391402247, 3.7831853071795862],\
            [-1.4381221301992597, -1.969164396057361, 1.4351484047723992, 0.11691985332275436, 0.793984982122215, 1.1115103530485912, 3.2595865315812875],\
            [-1.0759694790727565, -1.7653101852953867, 1.7330118510252739, 0.6222073599452446, 0.6174048532482165, 0.8363342378308655, 2.735987755982989]]

    rospy.init_node('actionlib_test')
    rospy.sleep(1)

    traj = Trajectory()
    r = traj.exec(jval_list)
    print(r)


if __name__ == "__main__":
    main()
同时对双臂进行控制
- 修改
yumi_moveit_config/config/controllers.yaml,移除yumi/joint_traj_pos_controller_r和yumi/joint_traj_pos_controller_l。joint只能被一个controller占用,重复调用会导致后面的controller不能正常连接。添加
- name: yumi/joint_traj_pos_controller_both
action_ns: follow_joint_trajectory
type: FollowJointTrajectory
joints:
- yumi_joint_1_l
- yumi_joint_2_l
- yumi_joint_7_l
- yumi_joint_3_l
- yumi_joint_4_l
- yumi_joint_5_l
- yumi_joint_6_l
- yumi_joint_1_r
- yumi_joint_2_r
- yumi_joint_7_r
- yumi_joint_3_r
- yumi_joint_4_r
- yumi_joint_5_r
- yumi_joint_6_r
- 修改
yumi_control/config/traj_controllers.yaml。不移除joint_traj_pos_controller_l和joint_traj_pos_controller_r不会在启动时影响占用,但是会在moveit中出现额外的无法控制的关节组(MoveGroup),所以还是应当删除?。添加:
joint_traj_pos_controller_both:
type: "position_controllers/JointTrajectoryController"
joints:
  - yumi_joint_1_l
  - yumi_joint_2_l
  - yumi_joint_7_l
  - yumi_joint_3_l
  - yumi_joint_4_l
  - yumi_joint_5_l
  - yumi_joint_6_l
  - yumi_joint_1_r
  - yumi_joint_2_r
  - yumi_joint_7_r
  - yumi_joint_3_r
  - yumi_joint_4_r
  - yumi_joint_5_r
- yumi_joint_6_r- 修改项目的启动文件(launch file),如
rws_online.launch,
	<rosparam file="$(find yumi_control)/config/traj_controllers.yaml" command="load" ns="/yumi"/>
  <arg name="arm_controllers" default="joint_state_controller
                                   joint_traj_pos_controller_l
                                   joint_traj_pos_controller_r
                                   joint_traj_pos_controller_both"/>
  <node name="arm_controller_spawner" pkg="controller_manager" type="spawner" respawn="false" output="screen" args="$(arg arm_controllers)" ns="/yumi"/>
  ```
5. 启动前执行`catkin build`及`source`工作环境下的`setup.bash`
6. 其它:在KTH的[参考代码](https://github.com/kth-ros-pkg/yumi_demos/blob/master/yumi_moveit_demos/src/yumi_moveit_demos/yumi_moveit_utils.py)中可以不修改以上两个文件直接调用control group?
  ```python
  group_both = moveit_commander.MoveGroupCommander("both_arms")
  group_both.set_planner_id("ESTkConfigDefault")
  group_both.set_pose_reference_frame("yumi_body")
  group_both.allow_replanning(False)
  group_both.set_goal_position_tolerance(0.005)
  group_both.set_goal_orientation_tolerance(0.005)
  ```
#### Ref
- [Programming interface](https://moveit.readthedocs.io/en/latest/doc/pr2_tutorials/planning/scripts/doc/move_group_python_interface_tutorial.html)